Flash on Mavica
A guide to the built-in flash on Mavica cameras — modes, range, guide numbers, and tips for getting good results with a small on-camera flash.
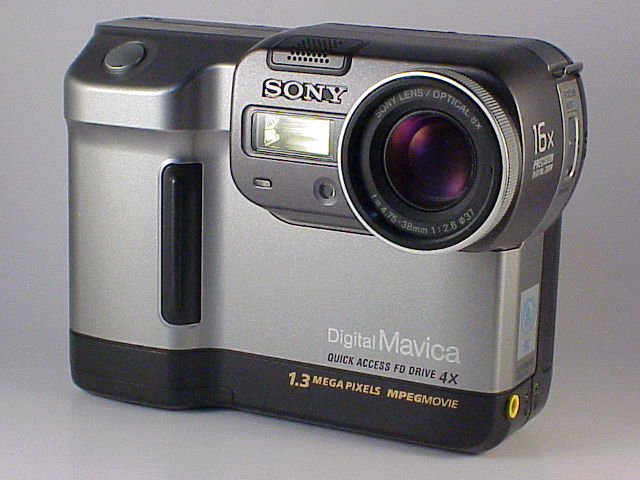
Built-in flash on Mavica cameras
Every digital Mavica camera (from the FD5 through the CD1000) includes a small built-in pop-up or fixed flash unit. These are low-powered flashes designed for casual indoor and close-range photography.
Flash modes
Most Mavica models offer four flash modes, selectable via a button or menu:
Auto Flash
The default mode. The camera fires the flash automatically when the light meter determines the scene is too dark for a proper exposure. In bright daylight, the flash stays off.
Flash On (Forced Flash / Fill Flash)
The flash fires on every shot regardless of ambient light. Useful for:
- Fill flash outdoors: Fills in shadows on faces during backlit portrait situations
- Consistent lighting: Ensures every shot in a series has the same flash illumination
Flash Off (Suppressed)
The flash never fires. Use this for:
- Long exposures: Prevents the flash from overpowering the ambient light effect
- Museums and galleries: Where flash photography is prohibited
- Shooting through glass: Flash reflecting off glass ruins the shot
- Atmospheric shots: When you want natural light only
Slow Sync
Available on higher-end models (FD88+, CD-series). Combines a slow shutter speed with flash — the flash freezes the subject while the slow shutter captures ambient light and motion blur in the background. Creates dramatic night-time effects.
Red-Eye Reduction
A pre-flash fires before the main flash to contract the subject's pupils, reducing the red-eye effect in portraits. Available on FD71+ models. Adds a ~1 second delay between pressing the shutter and taking the photo.
Flash specifications
| Model Group | Guide Number (GN) | Effective Range (ISO 100) | Flash Type |
|---|---|---|---|
| FD5, FD7, FD51 | ~6 (m) | 0.3–2.0 m | Fixed |
| FD71–FD87 | ~8 (m) | 0.3–2.8 m | Pop-up |
| FD88, FD90, FD92 | ~10 (m) | 0.5–3.5 m | Pop-up |
| FD91 | ~10 (m) | 0.5–3.5 m | Pop-up |
| FD95, FD97 | ~10 (m) | 0.5–3.5 m | Pop-up |
| FD100, FD200 | ~8 (m) | 0.3–2.8 m | Pop-up |
| CD200–CD500 | ~8–10 (m) | 0.5–3.5 m | Pop-up |
| CD1000 | ~10 (m) | 0.5–3.5 m | Pop-up |
Guide Number (GN) is a measure of flash power. To calculate the maximum effective distance: GN ÷ f-number = maximum distance. For example, GN 10 at f/2.8 = 3.5 metres.
Flash and exposure modes
| Flash Feature | Auto-only Models | Program AE Models | P/S/A/M Models |
|---|---|---|---|
| Auto Flash | ✅ | ✅ | ✅ |
| Flash On | ✅ | ✅ | ✅ |
| Flash Off | ✅ | ✅ | ✅ |
| Slow Sync | ❌ | ❌ | ✅ |
| Flash Exposure Comp. | ❌ | ❌ | Some models |
On models with manual exposure (M mode), the flash still fires at its auto-determined power level — there is no manual flash power control on any Mavica.
Common flash problems on Mavica
Washed-out close-ups
Mavica flashes are designed for 1–3 metre range. Subjects closer than 50 cm will be severely overexposed. For close-up flash work, diffuse the flash with a small piece of tissue paper or translucent tape.
Insufficient range
Beyond 3–4 metres, the flash provides negligible illumination. Don't bother with flash at concerts, sporting events, or any large-venue situation — it just drains the battery.
Uneven illumination
At the wide-angle setting, the flash coverage is generally adequate. At full telephoto zoom, the flash may not cover the entire frame, resulting in a bright centre and dark edges.
Slow recycle time
After firing, the flash needs 3–8 seconds to recharge (varies by model and battery charge level). During this time you cannot take a flash photo. On floppy models, this combines with the floppy write delay for a total shot-to-shot time of 5–12 seconds.
Flash and battery life
The flash is one of the biggest battery drains on a Mavica. Each flash cycle draws significant current from the NP-F battery. Expect:
- Flash off: 150–300+ shots per NP-F550 charge
- Flash auto (50% usage): 80–150 shots
- Flash on (every shot): 50–100 shots
If battery life is a concern, use Flash Off mode and work with available light whenever possible.
Practical tips
- Use fill flash outdoors: Forced flash in bright daylight fills shadows under hats, chins, and eye sockets. It's the single best way to improve outdoor portraits.
- Bounce or diffuse: Tape a small white card at 45° behind the flash to bounce light toward the ceiling. This softens the harsh direct-flash look.
- Avoid flash through glass: The reflection will ruin the shot. Turn flash off when shooting through windows, display cases, or aquariums.
- Watch your range: If your subject is more than 3 metres away, flash won't help. Switch to Flash Off and brace the camera for a slow shutter instead.
- Red-eye reduction helps but isn't perfect: Ask subjects to look slightly away from the camera for the best red-eye avoidance.
Related Knowledge
Metering Modes
How Mavica cameras measure light — multi-zone, centre-weighted, and spot metering — and which models offer which options.
Camera TechnologyExposure Modes Explained
A walkthrough of Auto, Program AE, Shutter Priority (S), Aperture Priority (A), and Manual (M) exposure modes available on Mavica cameras.
Camera TechnologyBattery Life & Shot Counts
Realistic battery life expectations for every Mavica model — how many shots you can get per charge, what affects battery drain, and strategies for maximizing time in the field.
Repair & RestorationUnderwater Mavica Photography: MPK Housings & Technique
Sony produced dedicated underwater housings for several Mavica models — the MPK series. This guide covers the available housings, compatible cameras, underwater technique with a Mavica, and adapting the approach for modern use.
TechniquesFlash Capacitor Safety: Essential Precautions for Mavica Repair
Every Mavica camera with a built-in flash contains a high-voltage capacitor. This component can deliver a dangerous electrical shock — even when the battery is removed. This article explains the risks and how to safely discharge the capacitor before any internal repair work.
Repair & Restoration